

The Stages of Hardware Product Development
Developing a hardware product is a complex journey that combines creativity, engineering, and industrial discipline. Going from an idea to a certified, manufacturable product requires a structured process and collaboration between multiple domains — mechanical design, electronics, firmware, and production.
How do you move from idea to prototype? When should you start certification? How can you avoid common pitfalls? In this article, AQ-Tech shares its proven methodology, refined through years of experience across dozens of successful product developments.
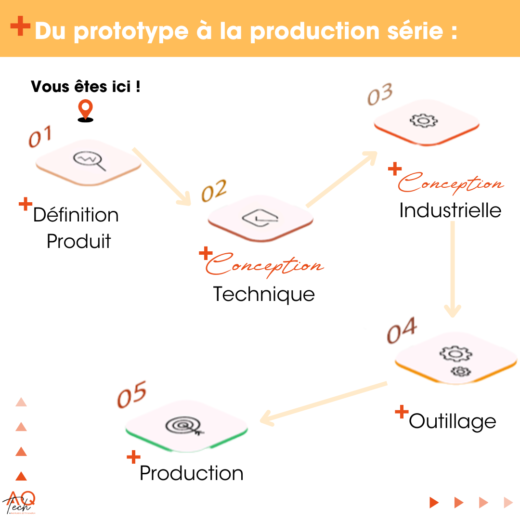
1. A structured, step-by-step process
No product jumps directly from idea to industrialization. Each phase validates one dimension — function, design, usability, manufacturability — before the next begins. The rule: test, validate, iterate at every step, keeping effort proportional to the project’s maturity.
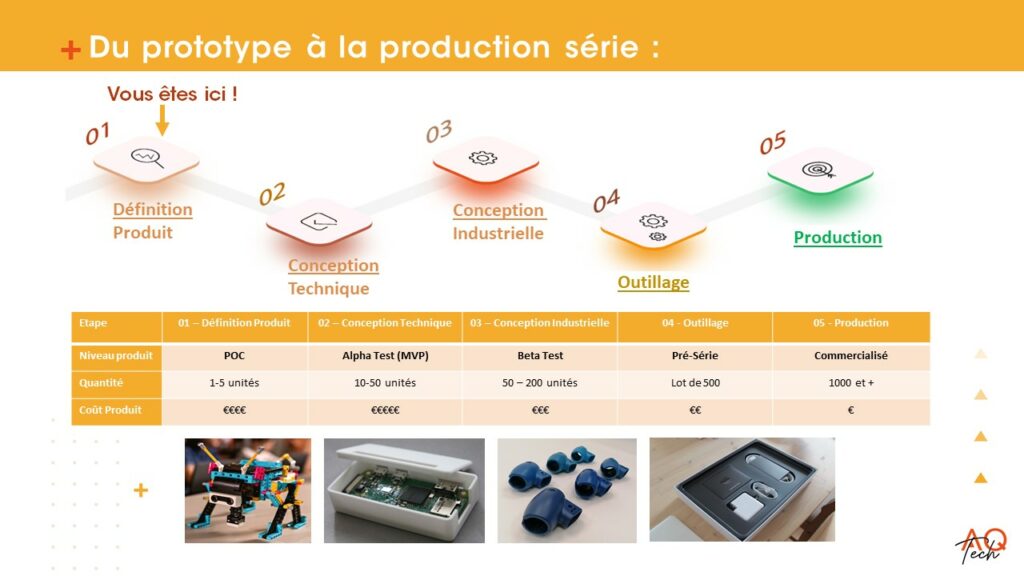
2. Product definition
Everything starts with product definition. The goal is to translate an idea into a clear, functional concept. This phase defines:
- Technical feasibility
- Design and ergonomics
- User interaction and experience
- Environmental and regulatory constraints
We prototype fast, test early, and iterate efficiently. Early mockups may be made from foam or 3D prints; early electronics often rely on Arduino or Raspberry Pi boards. The goal is not perfection — it’s learning fast.
For more on this topic, read our dedicated article on product architecture studies.
3. Technical design
Once the concept is defined, the focus shifts to developing the technological core of the product — the actual sensors, microcontrollers, firmware, and connectivity modules that will make it work.
This phase prioritizes technical performance and validation over aesthetics. Each subsystem is tested under demanding conditions to ensure robustness. Several iterations may be needed to optimize hardware and firmware integration.
Cross-domain collaboration between electronics and firmware engineers is essential to guarantee stability and scalability.
4. Industrial design
Once technologies are locked, the team transitions to industrial design — optimizing every detail for mass production. Every clip, screw, assembly direction, and tolerance matters.
The aim: maximize reliability while minimizing cost. This stage often involves close collaboration with manufacturing partners (mold makers, EMS suppliers, mechanical subcontractors) to ensure the product is feasible and efficient to produce.
This phase concludes with beta prototypes — fully functional units in final materials but produced through pre-series methods. Certification testing usually begins at this point.
5. Tooling and optimization
Once the final design is approved, production tooling is launched: injection molds, assembly jigs, test fixtures, and quality control tools. These specialized tools take weeks or months to complete and fine-tune.
Initial sample runs are used to calibrate and adjust the tooling before approval for production. This meticulous phase ensures consistent quality and dimensional accuracy.
Read more in our guide 5 Keys to a Successful Injection Mold.
6. Production and industrialization
With validated tooling, the product enters full-scale production. The launch begins with progressive lot sizes to validate process stability and ensure repeatable quality.
A quality assurance protocol is established — covering dimensional checks, functional testing, and traceability — and is maintained throughout the product’s lifecycle.
7. Conclusion
Every product has its own pace. Some require multiple technical loops; others move faster depending on complexity. But one rule always applies: test and validate continuously. Skipping stages often leads to costly redesigns later.
At AQ-Tech, we manage the entire journey — from concept definition to industrial production — uniting mechanical, electronic, and software design within a single integrated process. Our mission: transform your ideas into reliable, manufacturable, and innovative hardware products.
